Trolling motors, essential for slow-speed boat propulsion, rely on batteries to power their electric motors. Proper battery maintenance is crucial to ensure optimal performance and longevity. This guide will delve into the intricacies of charging trolling motor batteries, providing step-by-step instructions and valuable tips. By following these guidelines, you can maximize the lifespan of your trolling motor battery and enjoy uninterrupted fishing adventures. Whether you’re a seasoned angler or a newcomer to boating, understanding how to charge your trolling motor battery is essential for a hassle-free and enjoyable experience on the water.
What is a Trolling Motor?
A trolling motor is a small, electric-powered motor designed specifically for slow-speed propulsion of boats, primarily used in fishing. It’s a crucial tool for fishermen, especially those who practice trolling, a technique that involves dragging fishing lines behind a slowly moving boat.
Key Features and Benefits
- Quiet Operation: Trolling motors are renowned for their quietness, which is essential for avoiding spooking fish. The lack of noise allows fishermen to approach fishing spots without disturbing aquatic life.
- Precise Control: These motors offer exceptional control, allowing fishermen to maneuver their boats with precision. This is particularly valuable when targeting specific areas or maintaining a steady drift.
- Efficiency: Powered by batteries, trolling motors are highly efficient and environmentally friendly compared to traditional gasoline-powered engines. They consume less energy, reducing operating costs and emissions.
- Versatility: Trolling motors are available in various configurations, including bow-mounted and stern-mounted options. This versatility allows fishermen to choose the best setup for their boat and fishing style.
How Trolling Motors Work
Trolling motors typically consist of an electric motor, a propeller, and a battery. The motor converts electrical energy into mechanical energy, which drives the propeller. The propeller pushes the boat through the water, allowing for slow and controlled movement.
Common Uses
- Trolling: The primary use of trolling motors is to slowly move a boat through the water while fishing lines are dragged behind it. This technique is effective for targeting fish that are actively feeding or cruising.
- Anchoring: Trolling motors can be used to hold a boat in place, preventing it from drifting away from a desired fishing spot.
- Maneuvering: These motors are excellent for navigating through narrow waterways or shallow areas where traditional engines might be too powerful or cumbersome.
How Long Do Trolling Motor Batteries Last?
The lifespan of a trolling motor battery can vary significantly depending on several factors such as the type of battery, how frequently it is used, and how well it is maintained. On average, trolling motor batteries can last anywhere from 2 to 5 years. However, some premium batteries, like lithium-ion batteries, can last even longer, sometimes up to 10 years if properly cared for. The key to ensuring a long battery life lies in understanding your battery’s specific needs and following good charging and maintenance practices.
One of the biggest factors influencing battery lifespan is how the battery is charged. Many boaters wonder how to charge trolling motor battery properly to maximize its life. Charging a battery properly means more than just plugging it into a charger. Different battery types (lead-acid, AGM, and lithium-ion) require different charging techniques. For example, overcharging a lead-acid battery can cause sulfation, reducing its overall lifespan. On the other hand, failing to fully charge a lithium-ion battery regularly can affect its longevity. Using a “smart” charger that adjusts to the battery’s needs can help avoid these pitfalls, leading to longer battery life.
In addition to how you charge your trolling motor battery, other factors such as storage and usage patterns also play a crucial role in its longevity. Batteries stored in extreme temperatures, whether too hot or too cold, degrade faster than those stored in moderate conditions. Regularly using the battery and keeping it charged between uses can also extend its life. If a battery sits unused for long periods, especially if left discharged, it can lose capacity permanently. By keeping your battery in use and properly charged, you can prevent these issues and enjoy a longer-lasting battery.
Lastly, knowing when your trolling motor battery is nearing the end of its life is crucial. A good battery will hold its charge for several hours of use, but if you notice that the motor is running slower or stops working sooner than it used to, it may be a sign that the battery is deteriorating. Testing the battery’s voltage regularly with a multimeter and keeping an eye on performance can give you an idea of when it’s time to replace the battery. Combining proper charging habits, consistent usage, and smart storage techniques can help maximize the life of your trolling motor battery, ensuring it performs well for years to come.
What Type of Battery Charger Do You Need?
Choosing the right battery charger is critical to ensure the longevity and performance of your trolling motor battery. Different types of trolling motor batteries require specific chargers designed to meet their unique needs. The charger must match the battery’s voltage and chemistry, whether it’s lead-acid, AGM, or lithium-ion. Using the wrong charger can not only damage the battery but also shorten its lifespan. Modern smart chargers are the best option for most batteries, as they adjust the charging rate based on the battery’s condition, preventing overcharging or undercharging.
For example, lead-acid batteries need a charger that can handle their high capacity and occasional deep discharge cycles. AGM batteries require a charger designed to prevent overcharging, while lithium-ion batteries often need a specific lithium charger that ensures faster, more efficient charging. By using a compatible charger, you can help prolong the life of your battery and maintain optimal performance during your boating or fishing trips.
Different Types of Trolling Motor Batteries
Lead-Acid Wet Cell Batteries
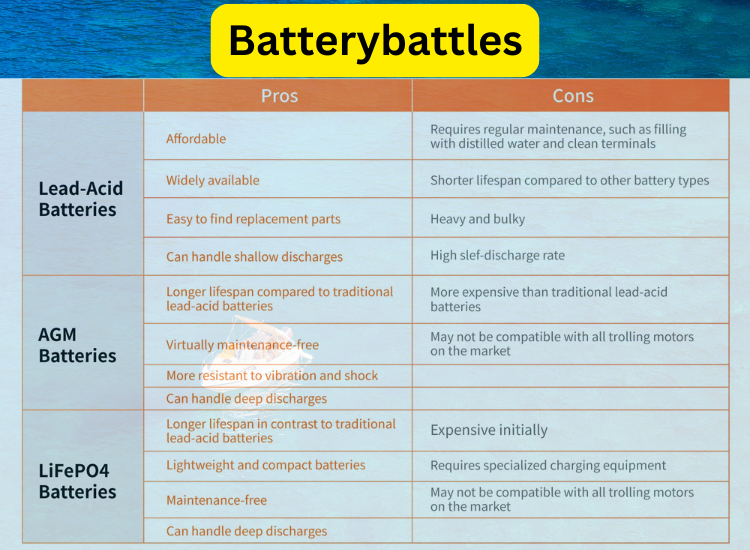
Lead-acid wet cell batteries are the most traditional and commonly used trolling motor batteries. These batteries are inexpensive compared to others and can handle heavy usage, making them a popular choice among boaters. They are composed of lead plates submerged in an electrolyte solution of sulfuric acid and water. These batteries require periodic maintenance, such as topping off with distilled water and ensuring the terminals are clean to prevent corrosion.
Advantages:
One of the biggest advantages of lead-acid batteries is their affordability. They provide a reliable source of power and can handle multiple deep discharges without significant damage if maintained properly. They are widely available and come in various sizes, which makes them adaptable for different types of boats and motors.
Disadvantages:
Lead-acid batteries require regular maintenance, such as adding water to ensure proper function. They are also quite heavy and can be challenging to move around. Additionally, they have a shorter lifespan compared to other battery types, typically lasting only 2 to 3 years with moderate usage. These batteries also take longer to charge, and overcharging can lead to sulfation, which reduces their effectiveness over time.
Uses:
Lead-acid batteries are ideal for those who need a budget-friendly power source for their trolling motor and don’t mind the additional maintenance. They work well for occasional boaters who do not require the longer lifespan or quicker charging of premium batteries.
AGM (Absorbed Glass Mat) Batteries
AGM batteries are a step up from traditional lead-acid batteries. These are sealed lead-acid batteries that use a fiberglass mat to absorb the electrolyte solution, making them spill-proof and maintenance-free. AGM batteries are known for their durability and ability to hold a charge for longer periods, making them suitable for more demanding boaters who spend extended hours on the water.
Advantages:
AGM batteries are maintenance-free, meaning you won’t need to worry about adding water or dealing with electrolyte leaks. They are more resistant to vibration and shocks, making them a great option for boats that encounter rough waters. AGM batteries also have a faster recharge time compared to lead-acid batteries and can deliver a higher power output, which makes them ideal for high-demand trolling motors. Additionally, AGM batteries can hold their charge for longer when not in use, making them a better choice for long-term storage.
Disadvantages:
The main downside of AGM batteries is their higher cost. They are more expensive than traditional lead-acid batteries, which may be a deterrent for those on a tight budget. Also, while they are durable, they can be sensitive to overcharging if the proper charger isn’t used. Finally, while they require less maintenance, they still need to be charged properly to prevent a reduction in capacity over time.
Uses:
AGM batteries are ideal for regular or heavy-use boaters who require long-lasting power and do not want to deal with frequent maintenance. Their durability makes them suitable for harsh conditions or boats that encounter rough water.
Lithium-Ion Batteries
Lithium-ion batteries represent the latest in battery technology and are the most advanced option for trolling motors. These batteries are lightweight, compact, and highly efficient, with a significantly longer lifespan compared to lead-acid and AGM batteries. They offer superior performance in terms of power output and charging speed, making them the go-to choice for serious boaters or those who want the best performance.
Advantages:
Lithium-ion batteries are by far the lightest and longest-lasting type of trolling motor battery. They can last up to 10 years with proper care, making them a worthwhile investment for those who use their trolling motor frequently. They also charge much faster than both lead-acid and AGM batteries, often in just a few hours, and provide a more consistent power output, meaning they won’t lose power as quickly during use. Additionally, they require no maintenance and are resistant to common issues like sulfation or over-discharge.
Disadvantages:
The biggest disadvantage of lithium-ion batteries is their high cost. They are significantly more expensive than other types of trolling motor batteries, which may be prohibitive for some boaters. Additionally, lithium-ion batteries require a specific charger designed for their chemistry. Using the wrong charger can lead to damage or reduced lifespan.
Uses:
Lithium-ion batteries are best suited for boaters who need the highest performance and are willing to pay a premium for it. They are ideal for competitive fishermen or anyone who spends long hours on the water and requires a lightweight, powerful, and reliable battery with minimal maintenance needs.
In short, the type of battery you choose for your trolling motor depends on your specific needs, including how often you use your motor, the conditions you boat in, and your budget. Lead-acid wet cell batteries are affordable but require more maintenance. AGM batteries are a bit more expensive but offer better performance with less upkeep. Lithium-ion batteries are the most advanced, offering the best overall performance, but they come with a much higher price tag. To ensure the longevity of any battery, it’s crucial to understand how to charge trolling motor battery properly, as each type has specific charging needs that, when met, will extend its life and performance.
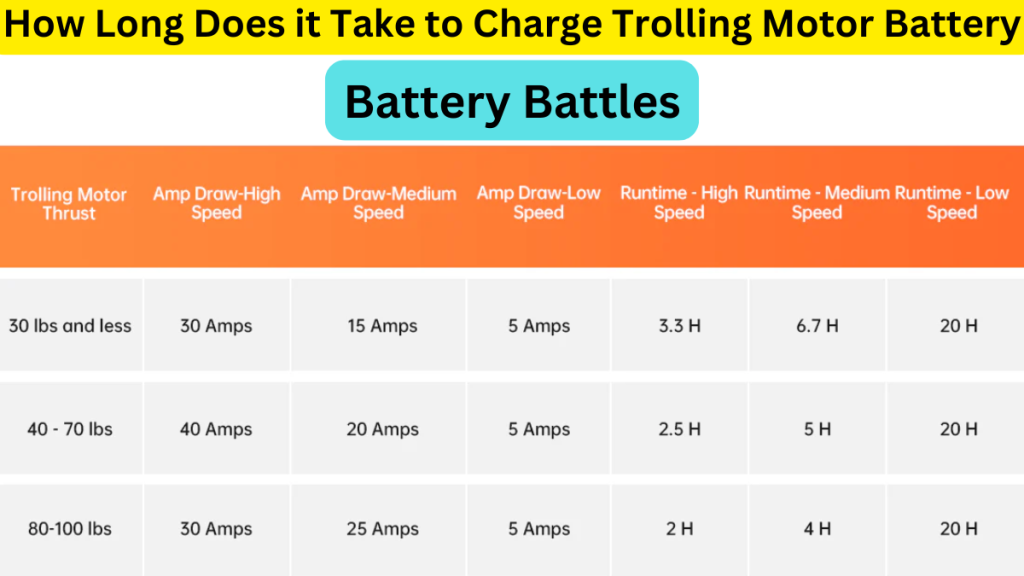
How Long Does it Take to Charge a Trolling Motor Battery?
The time it takes to charge a trolling motor battery depends on several factors, including the battery’s type, capacity (measured in amp-hours, or Ah), the state of discharge, and the charger’s output. In general, most trolling motor batteries will take anywhere from 4 to 12 hours to charge fully. However, this can vary significantly depending on the type of battery you’re using—lead-acid, AGM, or lithium-ion—and the power of your charger.
Battery Type and Charging Time
Lead-Acid Wet Cell Batteries:
These are the most common and affordable trolling motor batteries, but they tend to take the longest to charge. A fully depleted lead-acid battery can take anywhere from 8 to 12 hours to reach full capacity, especially when using a standard charger. While slow charging helps extend the life of lead-acid batteries, they also require careful attention to avoid overcharging, which can lead to sulfation and damage over time.
AGM (Absorbed Glass Mat) Batteries:
AGM batteries charge faster than traditional lead-acid batteries, typically taking between 6 and 8 hours to charge fully, depending on their size and the charger being used. AGM batteries are designed to handle higher current inputs, so they can recharge faster without the risk of damage. Using a smart charger designed for AGM batteries can optimize the charging time while ensuring the battery remains in good condition.
Lithium-Ion Batteries:
Lithium-ion batteries charge the fastest, often taking as little as 2 to 4 hours to reach a full charge, depending on the battery’s capacity and charger output. These batteries are designed to handle high current inputs and recharge more efficiently than lead-acid or AGM batteries. Additionally, lithium-ion batteries can often be charged to around 80% in a much shorter time, providing a quick power boost if needed.
Charger Output and Efficiency
The power of the charger plays a critical role in determining how long it will take to charge your trolling motor battery. Chargers are rated by their output, usually measured in amps. A charger with a higher amp rating will charge a battery faster than one with a lower rating.
2 to 5 Amp Chargers:
These are standard for slow, overnight charging. They are best for charging lead-acid batteries, which benefit from a slower charge to avoid damage. However, with a low amp charger, it can take over 10 hours to fully charge a large-capacity battery.
10 to 15 Amp Chargers:
These are mid-range chargers that offer a balance between charging speed and safety. A 10-amp charger can charge most trolling motor batteries in 6 to 8 hours, making it a good choice for AGM or lead-acid batteries that need faster charging without risking damage.
20+ Amp Chargers:
For those using lithium-ion batteries, high-amp chargers are more common. A 20-amp charger can reduce charging time significantly, allowing you to get back on the water much faster. These chargers are designed to handle the higher energy demands of lithium-ion batteries without overcharging or damaging the cells.
Battery Capacity and State of Charge
Battery capacity, measured in amp-hours (Ah), also influences how long it takes to charge a trolling motor battery. Larger capacity batteries, such as a 100Ah battery, will take longer to charge than a smaller battery with a 50Ah rating. Additionally, if your battery is deeply discharged (e.g., below 50% charge), it will take longer to recharge than one that is only partially depleted.
For example, a 100Ah lead-acid battery charged with a 10-amp charger could take around 10 hours to fully charge from a deeply discharged state. In contrast, a 50Ah AGM battery charged with the same 10-amp charger might only take about 5 hours.
Factors Affecting Charging Time
- State of Discharge:
If the battery is only slightly discharged, it will take less time to charge. Charging from 50% capacity will obviously take less time than charging from 20%. The less energy the battery needs, the shorter the charging process will be. - Environmental Conditions:
Temperature can affect charging time as well. Batteries charge slower in colder temperatures, while higher temperatures can reduce the overall lifespan of the battery if not monitored carefully. Ideally, charging should be done in moderate temperatures (around 68°F or 20°C) to optimize both charging speed and battery health. - Smart Chargers:
Using a smart charger that automatically adjusts the charging rate based on the battery’s condition can optimize charging time while preventing overcharging. Smart chargers can detect the type of battery and its charge level, adjusting the output to provide a safe and efficient charge. These chargers are especially useful for AGM and lithium-ion batteries.
Step-by-Step Guide: How to Charge a Trolling Motor Battery
Charging a trolling motor battery properly is crucial to extending its lifespan and ensuring peak performance. By following the correct procedures, you can avoid common issues such as overcharging, undercharging, or even damaging the battery. This guide will walk you through the step-by-step process on how to charge a trolling motor battery, ensuring that your battery is safely and efficiently charged each time.
Step 1: Ensure Safety First
Safety should always be the top priority when dealing with batteries. Before you begin charging your trolling motor battery, it’s essential to make sure that you’re working in a safe environment. Start by ensuring that the charging area is well-ventilated, especially if you’re charging a lead-acid battery. These batteries can emit gases such as hydrogen, which can be hazardous in poorly ventilated spaces. Avoid sparks, flames, or smoking near the charging area to prevent any potential fire hazards.
Next, inspect your battery for any signs of damage or leakage. Corrosion around the terminals, cracks in the casing, or any unusual odors could indicate that the battery is damaged and may need to be replaced before charging. Additionally, make sure to wear safety gear, such as gloves and goggles, to protect yourself from any accidental acid spills or electrical shocks. Handling battery terminals with care is essential to avoid short-circuiting or creating sparks. By ensuring safety first, you can proceed with charging confidently.
Step 2: Disconnect the Battery
Before charging, it is crucial to disconnect the trolling motor battery from your boat’s system. This step is necessary to prevent any electrical surges or short circuits while the battery is being charged. Disconnecting the battery also ensures that your trolling motor or any onboard electronics aren’t accidentally powered on during the charging process, which could lead to damage or injury.
To disconnect the battery, begin by switching off the motor and all electrical equipment connected to it. Then, carefully remove the negative (-) terminal cable first, followed by the positive (+) terminal cable. Removing the negative terminal first reduces the risk of accidental sparks. Be cautious not to let the cables touch each other, as this can cause a short circuit. Once disconnected, place the cables in a safe position where they won’t interfere with the charging process. By disconnecting the battery, you create a safer environment for charging and protect your trolling motor system from potential damage.
Step 3: Select the Appropriate Charger
Choosing the right charger is critical for ensuring that your battery charges efficiently and safely. There are several types of trolling motor batteries, including lead-acid, AGM (Absorbed Glass Mat), and lithium-ion, each of which may require a specific charger. To prevent overcharging or damaging the battery, always use a charger that is compatible with your battery’s chemistry and voltage.
For example, a lead-acid battery will require a different charger than a lithium-ion battery. Using a charger that offers multi-stage charging, or a “smart charger,” is recommended because these chargers automatically adjust the charging rate based on the battery’s condition. This helps prevent overcharging, which can damage the battery’s cells and reduce its lifespan. Additionally, make sure the charger has the appropriate amp rating. A higher amp rating means faster charging, but it may not be suitable for certain battery types. Always check the manufacturer’s recommendations to select the best charger for your trolling motor battery. Proper charger selection is key to maximizing the performance and longevity of your battery.
Step 4: Connect the Charger to the Battery
Once you have selected the appropriate charger, the next step in how to charge a trolling motor battery is connecting the charger to the battery terminals. Make sure the charger is turned off before making any connections to avoid sparks or accidental discharge. Start by attaching the positive (red) lead from the charger to the positive terminal on the battery. Then, connect the negative (black) lead to the negative terminal. It’s important to ensure that these connections are secure and free from corrosion to allow efficient energy transfer during the charging process.
In some cases, if your battery is connected to a series or parallel system (common in dual or multi-battery setups), you’ll need to disconnect the wiring between the batteries before charging them individually. If you’re charging multiple batteries, make sure each battery is properly isolated and connected to its own charger or charging bank to avoid imbalanced charging. Once everything is connected, you can then plug the charger into a power source and turn it on. By following this step carefully, you ensure that the charging process begins safely and efficiently.
Step 5: Monitor the Charging Process
While your trolling motor battery is charging, it’s important to monitor the process to ensure everything is running smoothly. Smart chargers typically display the current charge level and automatically shut off once the battery reaches full capacity, which makes monitoring easier. However, if you’re using a manual charger, it’s crucial to keep an eye on the charging time to prevent overcharging. Overcharging can lead to heat buildup, battery damage, or even explosions in extreme cases.
Check the charger’s indicator lights or display panel regularly to track the battery’s charging progress. For lead-acid or AGM batteries, charging typically slows down as the battery nears full capacity, which prevents overheating. If the battery becomes unusually hot during charging, stop the process immediately and inspect for any signs of damage. Keeping the charging environment cool can help prevent overheating, especially in warmer climates. Monitoring the process not only ensures your safety but also helps maintain the health of your trolling motor battery.
Step 6: Check for Full Charge and Disconnect
Once your battery has reached a full charge, it’s time to disconnect the charger. For smart chargers, the device will automatically shut off or switch to a maintenance mode when the battery is fully charged. Manual chargers, on the other hand, require you to monitor the voltage or charging time closely to determine when the battery is full. Typically, a fully charged 12V battery should read around 12.6 to 12.8 volts when measured with a multimeter.
Before disconnecting, turn off the charger to prevent any sparking. Start by removing the negative lead first, followed by the positive lead. This sequence helps minimize the risk of electrical arcing or sparks. Once disconnected, reconnect the battery to your trolling motor system, starting with the positive terminal and then attaching the negative terminal. Ensure the connections are clean and tight to prevent power loss or corrosion over time.
By carefully following these steps, you can safely and efficiently charge your trolling motor battery, ensuring it’s ready for your next fishing trip or boating adventure. Understanding how to charge a trolling motor battery properly will help extend the battery’s life and ensure consistent performance on the water.
How to Charge a Trolling Motor Battery While on Water
Charging a trolling motor battery while out on the water can be challenging but not impossible, especially if you’re planning extended trips where access to land-based charging options isn’t readily available. Whether you’re on a fishing expedition or a multi-day boating trip, keeping your battery charged is crucial for ensuring the motor operates effectively throughout your journey. Here’s a detailed guide on how to charge a trolling motor battery while on the water.
Option 1: Use a Solar Charger
One of the most convenient and eco-friendly ways to charge your trolling motor battery while on the water is by using a solar charger. Solar chargers work by harnessing energy from the sun and converting it into electricity to charge your battery. They are portable, easy to set up, and perfect for maintaining a charge while you’re out in nature.
To use a solar charger:
- Position the solar panels in a location on your boat where they will get maximum sunlight exposure. Many solar chargers come with flexible panels that can be mounted or laid flat on the deck.
- Connect the charger to your trolling motor battery. Most solar chargers come with connectors that allow you to hook them up directly to the battery terminals (positive to positive and negative to negative).
- Let the solar charger work throughout the day. While the charge rate may not be as fast as a traditional charger, it can keep your battery topped up, especially if you’re not using the motor continuously.
Advantages of solar chargers include no fuel costs, no emissions, and the ability to keep your battery charging passively as you fish or relax on the boat. However, they are weather-dependent, and charging times can be slow.
Option 2: Onboard Alternator Charging
If your boat has an outboard or inboard motor, you may be able to charge your trolling motor battery using the boat’s alternator. This method allows you to recharge the battery while the boat’s engine is running, making it a practical solution for those who spend a lot of time cruising from spot to spot.
Here’s how to set up alternator charging:
- Ensure your boat’s alternator is compatible with charging an additional battery. Many modern boats come with multi-battery setups where one alternator charges both the starting and trolling motor batteries.
- Install a battery isolator or switch. A battery isolator ensures that your trolling motor battery and starting battery charge separately, preventing one from draining the other. It also protects the main starting battery from being discharged, ensuring the boat’s motor can start when needed.
- Run the engine at intervals throughout the day to allow the alternator to charge the trolling motor battery.
The main advantage of alternator charging is that you don’t need to carry additional charging equipment. However, this method works best for boats with dual-battery setups and may require professional installation.
Option 3: Portable Generator or Inverter
Another effective way to charge your trolling motor battery while on the water is by using a portable generator or inverter. Portable generators are small, gas-powered devices that produce electricity and can be used to charge batteries when you’re away from shore power. Inverters, on the other hand, can convert the DC power from a car or boat engine into AC power to run a standard battery charger.
To use a portable generator:
- Bring a small, reliable generator on board your boat. Make sure it’s properly ventilated and positioned away from flammable materials.
- Connect your trolling motor battery to a battery charger and plug it into the generator’s AC outlet. Be sure to use a charger that’s compatible with your battery type.
- Run the generator while charging the battery. Be mindful of the fuel level and ensure the generator is positioned safely to avoid any hazards.
The advantage of a portable generator is that it provides a steady source of power, making it one of the fastest ways to charge your battery on the water. However, it does require bringing fuel and managing exhaust fumes, which may not be ideal for all boating situations.
Option 4: Wind Turbine Charger
Wind turbine chargers can be another sustainable option for charging a trolling motor battery while on the water, especially for sailors or boaters who spend long periods in windy conditions. Wind chargers work similarly to solar panels, but instead of using sunlight, they generate electricity from wind energy.
To use a wind turbine charger:
- Install a small wind turbine on your boat in an area that receives constant airflow. This could be on the deck or mast of a sailboat.
- Connect the wind turbine to your trolling motor battery, following the manufacturer’s instructions to ensure safe operation.
- Let the wind turbine generate power throughout your trip. It will continue charging the battery as long as there’s wind.
While wind turbine chargers can generate a steady charge, they are often weather-dependent, requiring consistent wind speeds to work effectively.
Considerations for Charging on the Water
When charging a trolling motor battery while on the water, it’s important to monitor the battery’s state of charge and temperature to avoid overcharging or overheating. Always use chargers that are specifically designed for marine environments, as they are built to withstand water, humidity, and salt exposure.
Also, keep in mind that charging times will vary depending on the method you choose. Solar and wind chargers will take longer to charge a battery compared to generators or alternators, but they offer the benefit of clean, renewable energy.
How to Charge a Trolling Motor Battery at Home
Charging your trolling motor battery at home is not only convenient but also crucial for ensuring that the battery is fully charged and ready for your next boating or fishing trip. Proper charging practices can help extend the life of your battery and keep your trolling motor running efficiently. Here’s a comprehensive guide on how to charge a trolling motor battery at home.
Step 1: Choose the Right Charger
The first and most important step in how to charge a trolling motor battery at home is selecting the right charger. Trolling motor batteries can vary in type, so it’s essential to match the charger with the specific battery chemistry (e.g., lead-acid, AGM, or lithium-ion). Chargers come in various sizes and types, with “smart” chargers being the best option because they adjust the charging rate based on the battery’s condition, preventing overcharging.
Here’s what to look for:
- Voltage Compatibility: Ensure the charger matches the voltage of your trolling motor battery (e.g., 12V, 24V, or 36V).
- Amp Rating: The charger’s amp rating determines how fast the battery will charge. A higher amp rating results in quicker charging, but for regular use, a 10-amp charger is usually sufficient.
- Multi-Stage Charging: Look for a charger that has a multi-stage charging system, which includes bulk, absorption, and float stages to protect the battery from overcharging.
Smart chargers are often the best choice because they can shut off automatically when the battery is fully charged, ensuring maximum safety and longevity.
Step 2: Prepare the Charging Area
Before beginning the charging process, make sure you have a safe and clean workspace. You should charge your trolling motor battery in a well-ventilated area, such as a garage or workshop, as batteries can emit gases during charging (especially lead-acid batteries). It’s essential to avoid enclosed spaces that lack airflow, as these gases can be harmful if inhaled in large quantities.
Here are some key preparation tips:
- Ensure good ventilation: Make sure the area is open and allows for proper air circulation.
- Avoid sparks or flames: Keep the area free from anything that could ignite gases, such as smoking, open flames, or electrical sparks.
- Check for damage: Inspect your battery for signs of corrosion, leakage, or physical damage before charging. If any issues are found, do not proceed with charging and replace the battery if needed.
Once you’ve set up a safe workspace, you’re ready to begin the charging process.
Step 3: Disconnect the Battery from the Boat
To safely charge your trolling motor battery at home, you should first disconnect it from your boat or trolling motor system. This prevents any accidental electrical discharge or damage to the trolling motor while the battery is charging.
Here’s how to disconnect the battery:
- Turn off all electronics: Make sure your trolling motor and any connected accessories are powered down.
- Remove the negative terminal first: Use a wrench to carefully disconnect the negative (-) terminal of the battery. Always remove the negative terminal first to reduce the risk of sparking.
- Disconnect the positive terminal: After removing the negative cable, proceed to disconnect the positive (+) terminal.
Once the battery is disconnected, you can move it to the charging area or leave it in place if the charging cables can easily reach it.
Step 4: Connect the Charger to the Battery
Now that your battery is safely disconnected and in the charging area, it’s time to connect the charger. Make sure the charger is turned off before making any connections to avoid sparking or accidental discharge.
Here’s the correct way to connect the charger:
- Attach the positive (red) lead to the positive terminal: Connect the red lead from the charger to the positive (+) terminal of the battery.
- Attach the negative (black) lead to the negative terminal: Next, connect the black lead to the negative (-) terminal of the battery.
- Double-check the connections: Ensure the connections are secure and there is no corrosion around the battery terminals. Clean the terminals if necessary before connecting the charger.
Once connected, you can plug the charger into a power outlet.
Step 5: Begin Charging and Monitor the Process
With everything connected, you can now turn on the charger and begin the charging process. Depending on the type of battery and charger, charging can take anywhere from a few hours to overnight. It’s crucial to monitor the battery during charging, especially if you’re using a manual charger that does not automatically shut off.
Here are some tips for monitoring the charging process:
- Check the battery’s temperature: If the battery becomes hot during charging, it could be a sign of overcharging or an issue with the battery itself. Stop charging and inspect for damage.
- Monitor the charge level: Smart chargers will display the battery’s charge level and automatically switch to a maintenance mode when the battery is fully charged. If using a manual charger, regularly check the charge to avoid overcharging.
Most 12V trolling motor batteries will be fully charged when the voltage reaches between 12.6 and 12.8 volts, which you can check using a multimeter.
Step 6: Disconnect the Charger and Reconnect the Battery
Once the battery is fully charged, it’s time to safely disconnect the charger and prepare your battery for use. Always turn off the charger before removing any connections to avoid sparks or electrical discharge.
Here’s the correct sequence:
- Turn off the charger: Ensure the charger is powered off before disconnecting the leads.
- Remove the negative lead first: Disconnect the black lead from the negative (-) terminal of the battery.
- Remove the positive lead: Then, disconnect the red lead from the positive (+) terminal.
If the battery was removed from the boat, you can now transport it back and reconnect it to the trolling motor system. Make sure to connect the positive terminal first, followed by the negative terminal, to safely power your system.
Charging Trolling Motor Batteries While Running
Charging a trolling motor battery while running the boat’s main engine can be an effective way to maintain power during long trips on the water. This technique ensures that the trolling motor battery stays charged, so you won’t have to worry about the battery running out, especially on extended fishing or boating trips. However, it requires the right setup and equipment to charge the battery safely and efficiently while running.
Here’s a detailed guide on how to charge trolling motor batteries while running, exploring the different methods available and their benefits.
How It Works: Charging from the Boat’s Alternator
The most common way to charge a trolling motor battery while the boat’s engine is running is through the boat’s alternator. The alternator in your boat’s engine generates electricity to charge the starting battery, and with the right setup, it can also charge your trolling motor battery.
Here’s how it typically works:
- Dual-Battery Setup: Boats that charge trolling motor batteries while running typically use a dual-battery setup. One battery is dedicated to starting the engine, while the other powers the trolling motor.
- Battery Isolator or VSR (Voltage Sensitive Relay): A battery isolator or VSR is used to control the flow of electricity between the starting battery and the trolling motor battery. This device ensures that the trolling motor battery only charges once the starting battery has enough power. It prevents one battery from draining the other.
- Alternator Charging: Once the starting battery is charged, the alternator diverts electricity to the trolling motor battery, charging it as the engine runs.
This system works best for boats with multiple batteries and ensures that both the starting and trolling motor batteries remain fully charged during your trip.
Advantages of Charging from the Alternator
- Convenience: Charging your trolling motor battery while the boat is running means you don’t have to worry about finding shore power or using portable chargers.
- No Additional Equipment Required: Once the system is installed, no external chargers or solar panels are necessary, making it a hassle-free solution for charging on the go.
- Efficient Use of Engine Power: The alternator uses the engine’s power to generate electricity, so you’re making the most out of the engine run time by simultaneously charging your trolling motor battery.
However, this setup may require some initial installation of a battery isolator or VSR, which can involve some technical knowledge or professional help.
Using an Onboard Charger
Another way to charge your trolling motor battery while running is by using an onboard charger that’s wired to both the boat’s engine and batteries. Onboard chargers are designed specifically for marine environments and can charge multiple batteries simultaneously, including the trolling motor battery and the engine starting battery.
Here’s how it works:
- Install an onboard charger that is connected to both the trolling motor and starting batteries. These chargers are waterproof and built to handle the harsh conditions of marine environments.
- Power the onboard charger using the engine: Some onboard chargers can be powered by the boat’s engine, which allows the trolling motor battery to charge while the boat is running.
- Monitor the charge levels: Many onboard chargers have indicators that let you know when the batteries are fully charged, helping you manage battery health efficiently.
The onboard charger is a great solution for those who want a more automated and user-friendly way to keep their trolling motor batteries charged while using the boat’s engine.
Portable Generators or Inverters
If you don’t have a dual-battery system or an onboard charger, you can still charge your trolling motor battery while running the engine using a portable generator or an inverter. This method works well for longer trips where you might need to charge your battery without returning to shore.
- Use a portable generator: A small gas-powered generator can be brought on board and used to charge your trolling motor battery. Simply connect your battery charger to the generator and let it run while you’re out on the water. Ensure the generator is safely placed in a well-ventilated area.
- Use an inverter: An inverter converts DC power from your boat’s main engine into AC power, which can be used to run a standard battery charger. This method allows you to use the boat’s engine to charge the trolling motor battery while running.
While portable generators and inverters are effective for charging on the go, they require additional fuel and equipment, making them a bit more cumbersome compared to an alternator or onboard charger system.
Solar Power as a Supplement
If you’re looking for an eco-friendly way to keep your trolling motor battery charged while running, solar power can be a great supplemental option. While it may not provide the full power needed to charge your battery as quickly as an alternator or onboard charger, it can help maintain the battery’s charge throughout the day.
- Install solar panels on your boat. These panels can be placed on the deck or any surface that gets direct sunlight.
- Use a solar charge controller to regulate the power flow to the trolling motor battery, ensuring that it charges safely and efficiently.
- Let the solar panels work while you run the boat: The solar panels can keep charging the battery in the background as you fish, sail, or cruise around the water.
Solar charging is ideal for boaters who spend long hours on the water and want to keep their batteries topped off without relying on fuel or a direct connection to the engine.
Monitoring Your Battery’s Charge
No matter which method you use, it’s important to monitor your trolling motor battery’s charge levels while on the water. Overcharging or undercharging your battery can lead to decreased performance and shortened battery life.
- Use a battery monitor: Install a battery monitor to keep track of your battery’s voltage, charge levels, and overall health. This helps you avoid overcharging or running the battery down too low.
- Check the temperature: Charging can cause your battery to heat up. Keep an eye on the battery’s temperature, especially if you’re charging while running the engine for extended periods.
Different Types of Battery Chargers and Their Pros and Cons
When it comes to how to charge a trolling motor battery, choosing the right charger can significantly impact the performance and longevity of your battery. Various types of chargers are available, each with its own set of advantages and disadvantages. Here’s an overview of the different types of battery chargers, detailing their pros and cons to help you make an informed decision.
1. Onboard Chargers
Onboard chargers are designed to be permanently installed on your boat, allowing you to charge your trolling motor battery while the boat is in use or when docked.
Pros:
Convenience: Once installed, onboard chargers provide a hassle-free way to charge your battery. You don’t need to manually connect and disconnect the charger each time you use it.
Multi-Battery Charging: Many onboard chargers are capable of charging multiple batteries simultaneously, which is beneficial if your boat has both a starting and a trolling motor battery.
Marine-Grade Design: Onboard chargers are built to withstand the marine environment, including exposure to water, salt, and vibrations, ensuring durability and long-term reliability.
Cons:
Initial Cost: The installation of an onboard charger can be expensive, especially if you opt for a high-end model with advanced features.
Installation Requirements: Installing an onboard charger may require professional assistance, which can add to the overall cost and complexity.
Limited Portability: Once installed, onboard chargers are not easily moved, making them less versatile compared to portable options.
Onboard chargers are a practical solution for those who frequently use their boat and want a reliable, integrated charging system for their trolling motor battery.
2. Portable Chargers
Portable chargers are standalone units that can be used to charge your trolling motor battery anywhere, whether at home or on the water.
Pros:
Versatility: Portable chargers can be used in various locations, making them ideal for use at home, at the dock, or even on the water if you have access to power.
Ease of Use: They are generally easy to connect and disconnect, allowing for quick and convenient charging.
Cost-Effective: Portable chargers are often less expensive than onboard chargers, making them a budget-friendly option for occasional use.
Cons:
Manual Operation: You need to manually connect and disconnect portable chargers each time you use them, which can be time-consuming.
Weather Exposure: Portable chargers are not designed for harsh marine environments, so they should be kept dry and protected from the elements.
Limited Charging Speed: Depending on the model, some portable chargers may have lower charging rates compared to onboard chargers or other advanced options.
Portable chargers are a flexible and cost-effective choice for those who need a simple solution for charging their trolling motor battery without the need for permanent installation.
3. Solar Chargers
Solar chargers use sunlight to generate electricity and charge your trolling motor battery. They are an eco-friendly option that harnesses renewable energy.
Pros:
Eco-Friendly: Solar chargers utilize renewable energy from the sun, making them an environmentally friendly choice for charging your battery.
Low Operating Costs: Once installed, solar chargers have minimal ongoing costs as they don’t require fuel or electricity from external sources.
Silent Operation: Solar chargers operate silently, which is ideal for a quiet and peaceful boating experience.
Cons:
Weather Dependent: Solar chargers rely on sunlight, so their effectiveness can be reduced on cloudy or rainy days, and they may not provide sufficient charge in low-light conditions.
Slow Charging: Solar chargers typically have a slower charging rate compared to other methods, making them less suitable for quick or high-demand charging needs.
Installation Complexity: Setting up solar panels on your boat can be complex and may require additional mounting hardware and wiring.
Solar chargers are an excellent choice for those who prefer a sustainable and low-maintenance solution for charging their trolling motor battery, provided they have access to adequate sunlight.
4. Smart Chargers
Smart chargers are advanced battery chargers that use microprocessor technology to optimize the charging process. They can automatically adjust the charging rate and provide detailed feedback on the battery’s status.
Pros:
Automatic Regulation: Smart chargers adjust the charging rate based on the battery’s condition, preventing overcharging and extending battery life.
Diagnostic Features: They often include diagnostic features that can alert you to potential battery issues, helping you maintain optimal battery performance.
Efficiency: Smart chargers are typically more efficient and faster at charging compared to basic chargers, providing a more reliable power source for your trolling motor.
Cons:
Higher Cost: Smart chargers can be more expensive than traditional chargers due to their advanced features and technology.
Complexity: The advanced functions and settings may require a learning curve or familiarity with battery maintenance practices.
Compatibility Issues: Ensure that the smart charger is compatible with your specific battery type and voltage to avoid any potential issues.
Smart chargers are ideal for users who want precise control over the charging process and are willing to invest in advanced technology to optimize their trolling motor battery’s performance.
5. Wind-Powered Chargers
Wind-powered chargers use wind turbines to generate electricity and charge your trolling motor battery. They are a renewable energy option similar to solar chargers but rely on wind rather than sunlight.
Pros:
Renewable Energy: Wind-powered chargers utilize wind energy, providing a sustainable and eco-friendly way to charge your battery.
Continuous Power: In areas with consistent wind, wind-powered chargers can provide a steady and reliable source of power for charging your battery.
Low Operating Costs: Like solar chargers, wind-powered chargers have minimal ongoing costs once installed.
Cons:
Wind Dependence: Their effectiveness is highly dependent on wind conditions. In calm weather, they may not generate sufficient power.
Installation and Maintenance: Wind turbines require proper installation and maintenance to ensure they function effectively, which can be complex and costly.
Noise and Vibration: Some wind turbines can produce noise and vibration, which may be disruptive on a boat.
Wind-powered chargers are suitable for those who are in consistently windy areas and want to utilize an additional renewable energy source for charging their trolling motor battery.
6. Inverter Chargers
Inverter chargers convert DC power from your boat’s engine or another power source into AC power to run a battery charger. They can be used to power standard battery chargers on board.
Pros:
Versatility: Inverter chargers can power a variety of devices, including battery chargers, making them a versatile addition to your boating setup.
Convenience: They allow you to use standard AC chargers on your boat, which can be more readily available and less expensive than specialized marine chargers.
Continuous Power: As long as you have a power source, such as the boat’s engine or an external generator, you can use the inverter to charge your battery.
Cons:
Power Consumption: Inverters themselves consume power, which can reduce the overall efficiency of the charging process.
Complex Setup: Proper installation and configuration of an inverter charger can be complex, requiring careful attention to ensure compatibility with your boat’s power system.
Cost: High-quality inverters can be costly, especially those designed for marine use.
Inverter chargers are ideal for those who need the flexibility to use standard chargers on their boat and have a reliable power source available.
Each type of charger offers unique benefits and potential drawbacks, so selecting the right one depends on your specific needs and circumstances. By understanding the pros and cons of each charger type, you can make an informed decision on how to charge a trolling motor battery effectively, ensuring optimal performance and longevity for your trolling motor setup.
Tips for Optimal Battery Performance
To ensure that your trolling motor battery remains in top condition and performs optimally, it’s important to follow some key practices. Proper care and maintenance can extend the life of your battery, enhance its efficiency, and ensure reliable performance during your time on the water. Here are essential tips for achieving optimal battery performance:
1. Regular Charging and Maintenance
Consistency is Key: Regular charging is crucial for maintaining the health of your trolling motor battery. Avoid letting the battery fully discharge before recharging, as deep discharges can shorten battery life. Ideally, recharge the battery after each use or before it drops below 50% charge.
Routine Maintenance: Inspect your battery regularly for signs of corrosion or damage. Clean the terminals and connectors with a solution of baking soda and water to prevent corrosion buildup, which can impede the battery’s performance and connectivity.
Check Electrolyte Levels: For lead-acid batteries, ensure that the electrolyte levels are adequate. Top up with distilled water if necessary, but avoid overfilling. Proper electrolyte levels help maintain battery efficiency and longevity.
2. Use the Right Charger
Select the Appropriate Charger: Using the correct charger for your battery type (e.g., lead-acid, AGM, or lithium) is crucial. Different batteries have specific charging requirements, and using the wrong charger can lead to poor performance or damage.
Invest in a Smart Charger: Consider using a smart charger that automatically adjusts the charging rate based on the battery’s condition. Smart chargers help prevent overcharging and undercharging, ensuring optimal performance and extending battery life.
Monitor Charging Time: Follow the manufacturer’s guidelines on charging times and avoid overcharging. Overcharging can generate excess heat and reduce battery lifespan.
3. Proper Storage Practices
Store in a Cool, Dry Place: When not in use, store your trolling motor battery in a cool, dry location away from extreme temperatures. Excessive heat or cold can negatively affect battery performance and longevity.
Maintain Charge Levels: If you’re storing the battery for an extended period, ensure it is charged to about 50% and periodically recharge it to prevent sulfation or discharge. A battery maintainer or trickle charger can help keep the battery at optimal charge levels during storage.
Avoid Deep Discharges: Deep discharges can damage the battery’s internal components. Aim to recharge the battery before it drops below 20% capacity to prevent deep discharges and maintain optimal performance.
4. Ensure Proper Installation
Secure Mounting: Ensure that the battery is securely mounted in its compartment. Movement or vibrations can damage the battery and its connections, leading to performance issues or safety hazards.
Correct Wiring: Check that all wiring and connections are properly installed and free from corrosion. Loose or corroded connections can cause power loss or inefficient battery operation.
Ventilation: If you’re using a lead-acid battery, ensure adequate ventilation in the battery compartment to prevent the buildup of harmful gases.
5. Avoid Excessive Load
Manage Power Usage: Avoid drawing excessive power from the battery by managing the load effectively. Use power-hungry accessories sparingly and ensure that the trolling motor’s power demands are within the battery’s capacity.
Optimize Motor Use: Use the trolling motor efficiently to conserve battery life. Avoid running the motor at maximum speed for extended periods and use lower speeds when possible to extend battery runtime.
Regular Checks: Monitor the battery’s voltage and performance regularly. If you notice any significant drops in voltage or performance, it may indicate a problem with the battery or the system.
6. Follow Manufacturer Guidelines
Read the Manual: Always follow the manufacturer’s guidelines for charging, maintenance, and usage. The manual provides specific recommendations tailored to your battery type and model, ensuring that you get the best performance and lifespan.
Adhere to Safety Instructions: Follow all safety instructions provided by the manufacturer to prevent accidents and ensure safe handling of the battery.
Use Compatible Accessories: Ensure that any accessories or components used with the battery are compatible and recommended by the manufacturer.
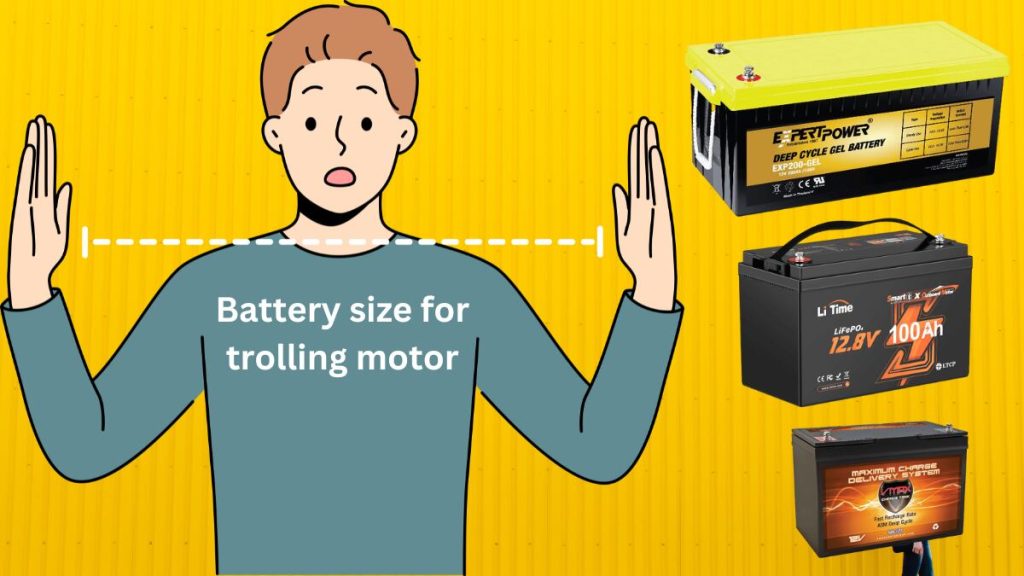
| Voltage of Motor | Motor Thrust | Recommended Max Amp of Batteries | Recommended LiTime LiFePO4 Batteries | Recommended Reasons |
|---|---|---|---|---|
| 12V | 20 ~ 30 lb | 50A | LiTime 12V 50Ah Lithium Battery | Cost-effective |
| 12V | 30 ~ 70 lb | 100A | LiTime 12V 100Ah Lithium Battery | Cost-effective, Low-temp, Lighter |
| 24V | 70 ~ 100 lb | 100A | LiTime 24V 100Ah Lithium Battery | Cost-effective |
| 36V | 100 ~ 120 lb | 100A | LiTime 36V 55Ah Lithium Battery | One single battery is enough |
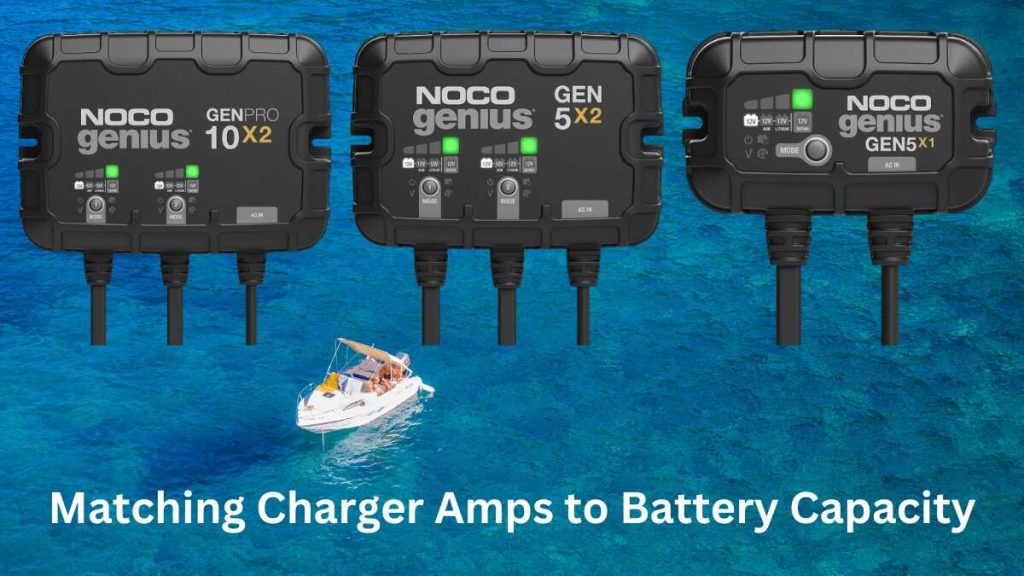
03 Best Battery Charger for Trolling Motor
Conclusion:
Charging your trolling motor battery effectively is crucial for maintaining optimal performance and extending its lifespan. By understanding the different charging methods and selecting the right charger, you can ensure that your battery remains in excellent condition and provides reliable power for your boating adventures. Whether you choose a smart charger for its advanced features, an onboard charger for its convenience, a portable charger for flexibility, or a solar charger for its eco-friendliness, each type offers unique benefits tailored to different needs and preferences.
Remember to follow best practices for charging, such as avoiding deep discharges, using the correct charger, and maintaining proper storage. Regular maintenance and monitoring are essential to prevent issues and enhance battery performance. By implementing these practices and choosing the most suitable charging solution, you’ll not only improve the efficiency of your trolling motor but also enjoy a more hassle-free and enjoyable boating experience. Proper battery care is key to keeping your equipment running smoothly and ensuring you get the most out of your time on the water.